Friday 30 September 2011

Appeal for 'JOYCE' & her maker's plates

Amongst the Sentinel 7109 missing items are the 'JOYCE' nameplates and the Sentinel maker's plates specific to works number 7109. These were mounted on the side of the cab as in the photo below. I have no idea where these plates are but the chances are that since the loco survived, so did these plates; but where are they now?
Sentinel 7109 Near-side 'JOYCE' & Maker's Plate
Sentinel Waggon Works had various designs of maker's plates and the design specific to 7109 is shown below. With a lot of work, a new pair could be recreated from the design; however, I don't have those sorts of skills, nor the time with all the other restoration activities in progress.
Locomotive Maker's Plate Design
Another simpler approach is to make a mould from another actual plate such as the one below. The drawback is that the result always comes out slightly on the small side due to shrinkage of the cast metal when it cools. (Normally a pattern is made oversize to suit the shrinkage of the particular metal to be used).
Isebrook's (6515) Makers Plate
Peter Mitchell, owner of Isebrook (6515) at Quainton Road, has kindly offered to make one available should we decide to do it this way. Obviously, we would have to blank out the 6515 and replace it with 7109.

But I'm still wondering where the originals are. I'd be really glad to hear from anyone who can throw some light on their whereabouts. Please post a comment below if you can help.

Tuesday 27 September 2011

Sentinel 7109's Lower Gear Housings

Since July 2011 (now September), I've taken some better photos for this article so here's the new 'enhanced' version!

Three new inspection bolts have been made for the level check holes in the lower gear housings.

Inspection bolt with blind axial hole and linked radial aperture
for oil level checking
The bolt is partly removed to check if oil comes out of the radial aperture
View from above
So why three level check holes and not just one? Simply, it depends on the size of the gear wheel inside. Sentinel offered the ability to change the gear ratio to suit each customer's haulage and speed requirements.

7109 was set up for slow, heavy haulage (I'm guessing here but it will be obvious in due course); hence it will have a large gear in the lower gear case. As a result, it will not need such a deep oil bath as one set up for higher speed with a smaller gear in the same place. So the the check hole actually used will be to suit the expected oil level inside.

Going off-subject for a moment, the Teifi Valley Railway visit on 18th September 2011 revealed an interesting angle on this with the double geared Sentinel 9622 built in 1958. Have a look at the next two photos:
Near side lower gear casing (9622)
Off side lower gear casing (9622)
Note that the drain cock (posh way of doing it) on the near side is on the middle level whereas, on the off side, the drain cock is on the top level. At first, this seems to be a mistake; however, it is a double geared loco with different sized gears in the near and off side casings. Hence a different oil level is needed for each. (It's inevitable that however many photos are taken at the time, something else needs to be illustrated when the time comes. Anyway, hopefully these are just about good enough to illustrate the point).

Also noteworthy in the 9622 photos is that bolts rather than studs/nuts are used to fix the plate in place.

Does anybody know what that big nut-like thing is in the middle of each cover plate? I guess it's a means of draining condensate from the gear case but it was so covered in green slime and it was raining hard that day so I didn't feel much like crawling about underneath and cleaning it up to find out!

A final noteworthy point: in the bottom right of the off side photo can be seen a drive chain. 9622 has double width chains whereas 7109 has single. The double chains would have been used for extra strength as, with double gearing, the drive would be only via the left or right hand chain depending on whether high or low gear was selected. 7109 has one single width chain per engine.

Back to 7109: the new gear housing bottom plates are under construction in preparation for crankcase oil to be added. Hopefully the oil will dampen the unceremonious 'clanking' heard when running on compressed air without a load.
The bottom plate goes here
Crankcase oil is a special type designed for Sentinel steam engines. Its specific characteristic is that water condensate separates out and sinks to the bottom easily for draining off.
Definitely Crankcase oil required!
When fitting 7109's gear case bottom plates, a gasket will be required between the plate and the housing. Hexagonal headed screws will need to be used with fibre washers to hold it in place as some of the holes into the housing are open to the oil contained within; without fibre washers and fixed-head screws, the oil will be able to seep out via the thread in the housing and the thread in the nut and possibly also between the nut and the bottom plate.

Saturday 24 September 2011

What will the Ashpan look like?

On 18th September 2011, I visited the Teifi Valley Railway (a round trip of 280 miles) to examine the only other double engined Sentinel loco in the UK.
Sentinel 9622 at Teifi Valley Railway 18th September 2011
Sentinel 9622 is looking a bit sorry for herself at the moment but is due to be put through a thorough 10 year overhaul and back into service before too long. It last ran on the Gwili railway around 2007.

A lot can be learned from examining other similar locos. 9622 is substantially different from 7109 as it benefits from 31 years of development. More perhaps in another article; however, one of the main reasons for the visit was to find out about the construction of an ashpan. Whilst drawings depict what is to be made, sight of the real thing really helps in understanding what's required.

Having said that, whilst 9622's ashpan matches the drawings, 7109's will have to be different as there are only four mounting points as opposed to the five shown here.

View from above
Cut-outs to allow air to the fire
This ashpan has clearly been used and the metal thickness is not as new.
View from underneath
Flap for emptying ash (1)
Flap for emptying ash (2)
A short chain is used to support the bracket so that the flap does not open too far.
Flap hinge close-up
Eagle-eyed observers will be wondering how the damper works. A fire is damped by reducing its air flow; this can be done either by stopping the air getting into the fire or stopping it from getting out. The Sentinel method is to place a flap over the top of the chimneys so there is no inlet damping.
7109's chimney flaps and operating handle

Friday 23 September 2011

Back to Black

Wednesday 21st September 2011 saw a coat of gloss black paint over the red oxide primer shown previously.
Lower front right hand corner of the boiler-free cab
Completion of the paintwork behind where the boiler will be located was the last (he said confidently!) preparatory task on the loco before the boiler can be refitted.
Lower front left hand corner of the boiler-free cab
I've been as thorough as possible in identifying all the things that would be rendered impossible once the boiler is in place. Looking at the photo, I'm wondering whether we ought to do the under-frame paintwork also.
Rear view of boiler-free cab
Nice blue hue, don't you think!

Thursday 22 September 2011

Joyce has a new hat!

After trying for ages to find a way to put the new cab roof in place, I concluded that an interim measure was needed to make progress on the cab-interior paintwork prior to the boiler being repatriated with the loco. Hence a new blue hat to protect from the elements!
New blue cab cover
In a previous article, I showed the cab being painted with red oxide paint ready for a gloss top-coat. However, the red oxide was done on 10th August 2011 and then rain and other difficulties got in the way. In the end, it was about five weeks between coats so much work was required to clean up the red oxide before it could be painted over.
And from the rear
The lack of available undercover facilities at Midsomer Norton station is becoming a real problem and not just for this project. Sentinel 7109 really needs to be protected from the elements for many months to complete the restoration - so a major stumbling block is on the horizon - particularly as winter approaches.

Monday 19 September 2011

Sentinel 8571 restored by the Salvage Squad


Sentinel 8571 at the SDC 'Noggin & Natter' 25th April 2009
Some time ago, I heard about a program in the Salvage Squad series which featured Mendip Steam Restorations Ltd repairing a Sentinel Waggon boiler for Waggon 8571. This is the same company that has also done the repairs to Sentinel 7109's boiler. Tony Thomas, the records' officer of the Sentinel Drivers' Club, also appears.

To my great satisfaction, I recently found the program by accident on YouTube!

It's split into four parts which can be run from the links below. It's a fascinating program and includes many challenges in common with Sentinel 7109's restoration.


Same day, same venue
Same day, same venue (same caption!)

Sunday 18 September 2011

Another Special Welcome...

... to all you garden-geeks arriving from VegPlotting!

(NSW, Non-Steam Wife) is still clearly generating a lot of traffic to Sentinel 7109. So here's another little gem of a posting especially for you!

Midsomer Norton won many competitions for best kept station and particularly for its horticultural efforts. As well as the greenhouse, there was the 'Sun, Moon and Stars' astronomical garden creation between the station building and the roadway.

In this 1922 photo, the garden is clearly in good order.
Midsomer Norton Station 1922
(Courtesy Richard Dagger Collection)
However, at the start of 2002, the garden was in a very sorry state with the area only mapped-out and not seemingly too fertile!
1st Jan 2002
1st Jan 2002 again
Note the appropriate sign beyond the buffer stop!
By the middle of 2005, the garden had been put back in place creating a reasonably authentic reproduction of the original. (Note - when the Silver Street bridge was removed, the area for the Sun, Moon and Stars was also cut-off in its prime; hence the new garden is actually slightly smaller than it used to be - but that's progress!).
7th July 2005 has the garden in place
and a steamy thing inhabiting the background!
Jumping to 2011, the Sun, Moon and Stars are resplendent in bright colours and a credit to the volunteers who look after it.
30th August 2011 
30th August 2011 again
Keep up the good work!

Saturday 17 September 2011

Shake, Rattle, Roll and Clank!

On 14th September 2011, I decided that I would give Sentinel 7109's engines a little exercise on compressed air. They are still not connected to the front axle as the chains have not yet been fitted and so running them on air is quite easy.

For the first video, I set up a tripod on the Midsomer Norton Station platform and pointed it at the leading engine's open cover; the result follows: (Also on YouTube)

There are some interesting noises. The clanking is the knocking together of the substantial gear teeth without any load to hold them in contact. A creaking noise seems to be one of the valve springs compressing. The regular hisses are the four valve pairs opening in turn; the fact that the sound is consistent for all four is a good sign.

To get nearer to the engine sounds, I then set up the camera with two of the tripod legs on the nearside running board on the of the loco. Little did I know that the engine would shake everything in sight including the camera. So apologies for a little fuzziness but it hasn't spoiled the detail. Can you tell whether the inlet valves (LHS) open and close at the same time as the respective outlet valves (RHS)? (Also on YouTube)


I did say Shake, Rattle, Roll and Clank. Pretty close to the mark!

Friday 16 September 2011

Radstock Sentinel Model is ready

Roger Slade of CSP models has been beavering away on an etched brass model Radstock Sentinel loco and it has now come to fruition. It is a superb model as is obvious from the pictures.
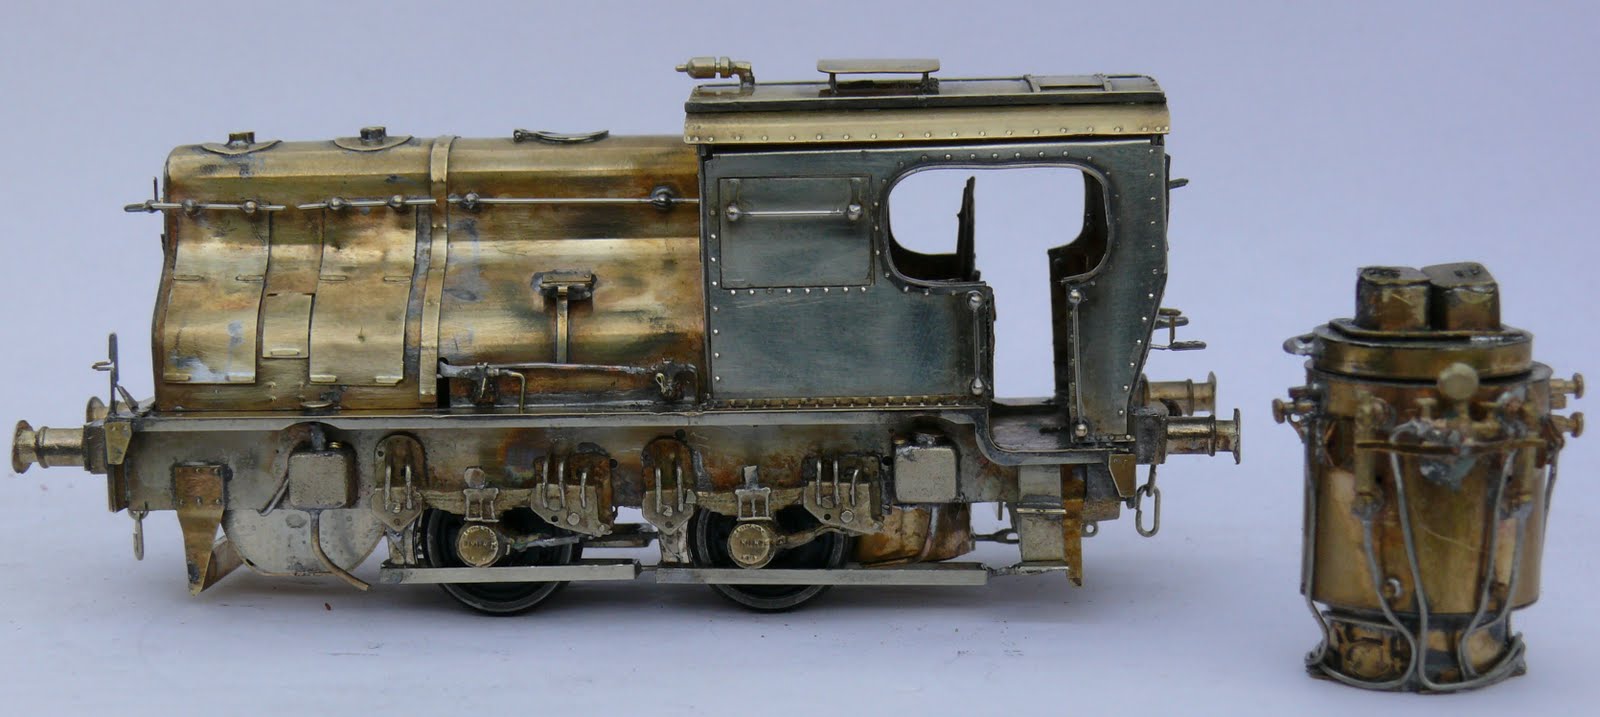
CSP Radstock Sentinel Model 
Roger's announcement (slightly edited for this context) is below:


S&DJR/LMS/BR. Sentinel 0-4-0T Steam Shunter.

Dorset based CSP Models in Dorchester have launched their long awaited 4mm etched brass kit for the Sentinel Shunter.
The project was started 2 years ago by CSP and Zenith Works. It was a challenge to produce an accurate and buildable kit for this quite complex locomotive. It wasn’t just to be a model but a lasting record of what these delightful little locos were.

With the priceless help of Andy Chapman and his long term lover “Joyce”, a set of somewhat doubtful works drawings, a fistful of photographic evidence and a great deal of optimism we set to work.

After a number of visits to MSN with a ruler and a camera we had our first set of drawings. A test etch was produced in November 2010 and a prototype produced. It looked OK but we found a number of inaccuracies. Andy let me see all the boiler fittings and with a set of drawings we decided to add a fully detailed boiler, ashpan, superheater and chimneys. How they went together was another matter but with the help of one of our most enthusiastic customers, Richard Roper of Emborough, who sketched a working model of the chimneys, we managed to get it right, we hope!!!!!

The chassis is driven by a “High Level” Gearbox through a series of spur gears to all 4 wheels. With the chassis weighted by the ballast in the boiler and ballast in the front chain box, yes it even has that and an etched chain! Maximum adhesion has been achieved.

The chassis, “00” or EM, with provision for compensation for P4, is Nickel Silver and the body a fusion of Nickel Silver and Brass. All the fittings are lost wax brass. The kit comes complete with wheels, gearbox, gears and motor. It also has etched number plates for both LMS and BR eras. All that is required to produce your own little masterpiece is hours of patience, some black spray and some decals.

There is a comprehensive, 16 page set of instructions with exploded diagrams of every stage of the construction. It is an eminently achievable project for people with average skills of kit construction. The cost of the complete kit is £135.00 + £5. 50 p&p; we can supply the basic kit for £95.00 for those that have their own ideas for motorising it.

We hope that it be well received by all S&D modellers. It has been a very difficult project to bring to fruition but we are happy with the outcome. We hope you are too.

A similar kit for “Joyce” in 4 & 7mm is nearly finished and will be available early in 2012.


It's very kind of Roger to acknowledge my assistance in the project. More so, I'm really pleased that he is working on a Joyce variation.


More pictures of this superb model are here below:


Incredible boiler detail!

Thursday 15 September 2011

Sentinel 7109's Superheater Assembled

The previous superheater article showed it passing its hydraulic test. Now it has been reassembled with the boiler's top plate at J R Goold Vintage Steam Restorations Ltd and it's as good as ready to fit to the boiler.

Superheater and Boiler assembly drawing
The superheater consists of four coils of tubing sitting in the top of the boiler supported by the top plate. The top plate then sits on top of the boiler inside the outer shell casing and is clamped down in six places.
Plan view of the superheater in place
Wet steam feeds the superheater inlet via a one to four-way manifold (elbow); the superheater outlet then feeds the stop valve and regulator assembly.
View through the top plate chimney apertures
The central support 'dish' is under construction
Four holes are provided for cleaning out with a steam lance. Each has a 'bung' to close it off when not in use. The bungs had become stuck fast due to corrosion and needed to be removed forcefully! As a result, new bosses had to be welded in place and tapped for the bungs. The bung's thread doesn't look too good and a new bung will be required. Fortunately this is an off-the-shelf item with a one inch BSP thread or thereabouts.
Reconstructed clean-out hole
Assembled top plate and superheater
Having said above that 'it's as good as ready to fit to the boiler', I have one hesitation; the central support 'dish'.
The support 'Dish'
For this to be effective, (you guessed) the dish has to be a larger diameter than the inner ring of the superheater. Thus it's not a bad idea to include the dish in the assembly before putting it all into the boiler as the dish won't fit through the inner ring from above afterwards!

Tuesday 13 September 2011

Sentinel 7109's Ashpan

Amongst Sentinel 7109's missing items from when it first came to Midsomer Norton station in December 2004 was an ashpan to sit below the boiler's firebox and grate. This was never going to be an off-the-shelf item and would need to be fabricated anew.

So where do you start with something like this?

The Sentinel Drivers' Club (SDC) has a drawings' archive and drawings can be obtained via the SDC archive page for a nominal sum. It's not quite that straight forward as first you need to know the drawing number required. This can take some time to work out but is not too difficult if an assembly drawing is available.

As such, the ashpan assembly drawing number for Sentinel 7109's boiler is 11815 although there is a simpler type under drawing 10634. As 11815 is a design which makes emptying of the ashpan more straight forward and doesn't tend to empty itself wherever it likes, that is the one that will be used.

Ashpan 11815 Drawing
(Courtesy Sentinel Drivers' Club)
Various other part detail drawings are indicated which will need to be purchased from the SDC to enable them to be made.

Detail Drawing Numbers (1)
Detail Drawing Numbers (2)
I was talking to a gentleman welder and fabricator who was visiting Midsomer Norton Station for the Heritage open weekend (10th September 2011). He said he was interested in helping to sort out the ashpan. So keep an eye on this page as it will be added to as the ashpan comes into being (fingers crossed!).

Sunday 11 September 2011

Sentinel 7109's Mechanical Lubricator - A Mystery Solved!

The previous posting about Sentinel 7109's Mechanical Lubricator left an unsolved mystery - namely why was there a piece of wire in three of the four pump barrels?
Wire lodged in the pump barrel...
...and extending down into the pump nozzle
Colin Evans, one of the last Somerset coal miners, provided the answer for me on 10th September 2011 at Midsomer Norton Station's Heritage open weekend event.

As the individual pumps are constructed at the moment, with brass barrels, the wires do not do anything at all and can be discarded. However, the pumps may have originally been constructed with glass barrels but with the glass later replaced by brass. Glass may even have been an option that was not chosen.
Brass barrels
The glass was intended to contain a quantity of water through which the droplets floated from the bottom to the top. As oil is lighter than water, when the pump injects a droplet of water, the droplet floats to the top and is pumped to its destination having displaced water from the top of the barrel.

The wire was to catch the droplet as it enters the barrel and guide it upwards along the wire. Without the wire, the droplet could follow any path and tend to deposit itself on the side of the glass so that neither could it be seen nor would it arrive at the top as a droplet. Hence water could be pumped instead of oil and flow monitoring rendered impossible.

With the lubricator mounted under the loco's engine covers, it could not be seen by the loco driver and certainly not able to be adjusted from the cab. Thus, while the loco was being driven, the ability to be able to monitor the oil droplets was of lesser importance.

Sentinel 7109's mechaniacl lubricator will be operated without water in its pump barrels and with opaque (brass) barrel material. Thus, it will operate blind but be able to be adjusted should more or less oil seem necessary.

The flow rate adjustment is made by shortening or lengthening the crank arm of the lubricator so that, for every driving stroke, the pump's camshaft is rotated less or more respectively.
Lubricator's crank arm length adjustment
Related Posts Plugin for WordPress, Blogger...